How to setup a home network with extra security for free
Introduction
Nowadays we all are using more and more internet connected devices at home together with ”Internet of Things” devices also called IoT. Below are just a few examples:
- computers & laptops
- cellphones & tablets
- Surveillance web cameras
- Multi media players / speakers / Smart TV’s
- Weather stations
Everything is online, connected to the internet and some of the devices are easily to use or administrate through an app on your phone or tablet.
With more and more devices connected to the internet, how do you secure them and by this your whole home network?
Devices & Tools needed
There are ”ready to use” products out there on the market. But they can maybe be a bit expensive.
See for example the F-Secure SENSE or the Bitdefender Box, two ”Smart routers”. With the disadvantage they are rather costly about 200 Euro, and every year you need to renew their subscription for additional cost to stay protected.
The nice thing is that the similar extra protection can be achieved much cheaper by using:
- Raspberry Pi Starter Kit ca. 70 Euro
- Raspberrian PI Linux OS – free
- Pi-Hole installed on your PI – free
- Several blocklists for Pi-Hole – free
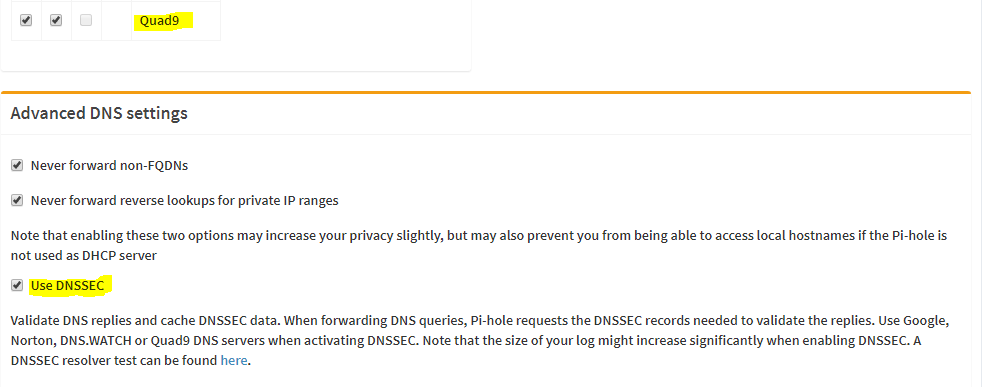
- Quad9 DNS server to block malicious websites – free
First steps:
Start and buy your Rapsberry Pi start kit, install Raspberrian Linux on it. Follow the instructions of updating everything to the latest version.
After the installation, lock your Pi to a fixed IP, either within the Pi OS, or by DHCP reservation in your existing home router.
Pi-Hole – Network wide add blocking and more
Just follow the instructions given on the Pi-Hole homepage.
Once this is done, you will have a default add blocking, including about 130.000 different domain names.
To get a better coverage I highly recommend to follow the instruction’s provided in CryptoAUSTRALIA’s Favourite Block Lists .
This will add a lot of lists which will block of the additionally categories:
- Malware and Phishing sites
- Tracking inside Windows and known IoT devices
- More advertisement sites than included in the default Pi-Hole configuration
You can select yourself which lists you want to add to your Pi-hole configuration.
For myself, the list of totally blocked domain names is at about 780.000 by the time of writing this blog article.
Quad9 DNS for Internet Security & Privacy
To increase security, using a public DNS server such as Quad9 is highly recommended. In the video below, you see a explanation of How DNS works, what Quad9 can do to protect you.
Quad9 provides the following description on their homepage.
When it comes to Security & Privacy it states:
Security: Quad9 blocks against known malicious domains, preventing your computers and IoT devices from connecting malware or phishing sites. Whenever a Quad9 user clicks on a website link or types in an address into a web browser, Quad9 will check the site against IBM X-Force threat intelligence that includes 800+ terabytes of threat intelligence data including 40B+ analyzed web pages and images and 17 million spam and phishing attacks monitored daily. Advanced analysis is performed on IP addresses to assign a risk score based on text, visual object recognition, optical character recognition (OCR), structure and linkages to other sites, and the presence of suspicious files to identify malicious IPs. This data feed combined with multiple other threat intelligence providers allows Quad9 to block a large portion of the threats that present risk to end users and businesses alike.
Privacy: No personally-identifiable information is collected by the system. IP addresses of end users are not stored to disk or distributed outside of the equipment answering the query in the local data center. Quad9 is a not-for-profit organization dedicated only to the operation of DNS services. There are no other secondary revenue streams for personally-identifiable data, and the core charter of the organization is to provide secure, fast, private DNS.
Further more CryptoAustralia published in December 2017 a DNS provider threat blocking test. Counting the number of malicious websites tested, Quad9 was blocking the highest number of malicious domain names.
Configuration inside your Pi-Hole
Inside your Pi-Hole admin GUI, go to Settings -> DNS, and mark Quad9 DNS servers only, if you not only have selected them during your initial Pi-hole setup.
Additionally you can also mark the ”Use DNSSEC” feature for increased security.
Final steps – Router DNS configuration
Once this internal set up is complete, the only thing remaining is to re-configure your home router to use the Pi-Hole as your DNS server.
Hopefully your home router is supporting this feature. Most routers does. But I have seen some ISP provided routers which do not allow the user to change the DNS settings inside the device.
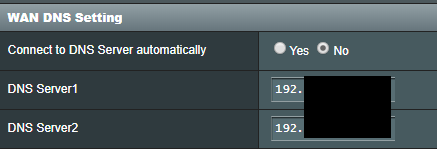
By default the most home routers are using the DNS server provided by your ISP. Check the manual for your router to find those settings. Usually the setting is somewhere located under ”WAN Setup”.
Instead of ”Automatically” select ”Manually” and use the IP adress of your Raspberry Pi, which you have given a fixed IP adress during device configuration.
Once this is done, all your devices connected to your home router, will now start using the Raspberry Pi and it’s Pi-Hole configuration for DNS requests.
The result
Below you see a screenshot of my Pi-Hole statistic, 9 devices connected during the last 24 hours and 31% blocked domain requests, which are a part of 783.519 known bad domain names.

This view does not include the domain names which additionally may have been blocked by the Quad9 DNS server used in your Pi-Hole.
Now you are enjoying secured network with advertisement and malware blocking and privacy protection for free. (except of the purchase of your Raspberry Pi)